Salads
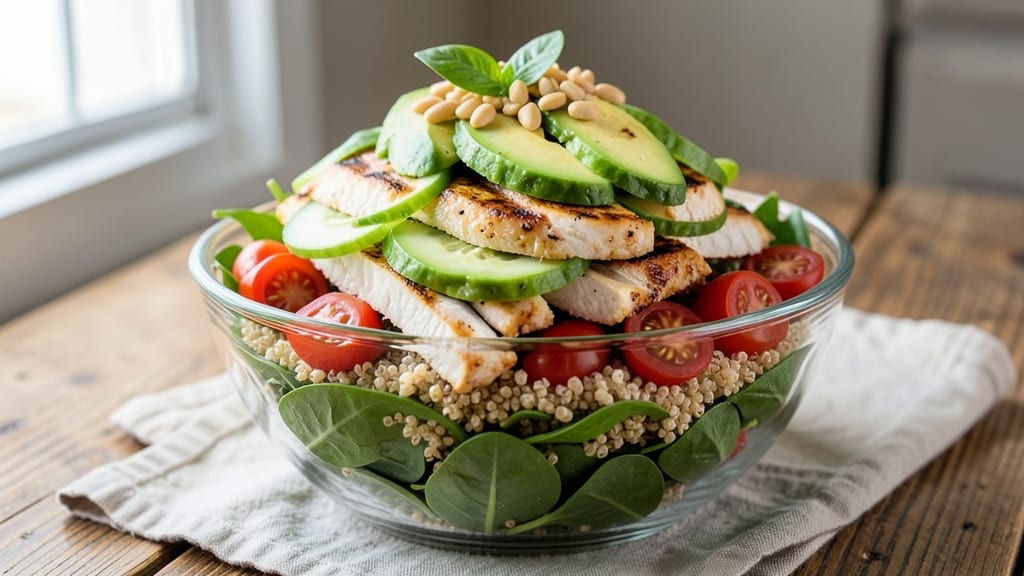
This 10-layer salad recipe transforms a simple bowl into a visually stunning masterpiece with contrasting textures and flavors. 🌟 The secret lies in strategic layering—starting with crisp greens, adding hearty grains and proteins, and finishing with creamy elements that tie everything together.
Each layer builds on the last, creating a salad that’s as impressive to look at as it is delicious to eat.
The beauty of this salad is in its versatility—you can customize every layer to fit dietary preferences or seasonal ingredients. Whether you're using grilled chicken, roasted vegetables, or plant-based proteins, the structure ensures balance and depth.
The dressing is key, too, as it binds the layers while enhancing each component without overpowering them.
What makes this salad truly special is how it delivers creamy elements—like avocado slices or a tangy yogurt dressing—without sacrificing crunch or freshness. The result is a harmonious blend of textures: crisp, chewy, creamy, and tender, all in one bite.
It’s perfect for gatherings, meal prep, or a show-stopping weeknight dinner.
Assembling the salad is easier than it looks—just follow the layer-by-layer instructions, and you’ll end up with a dish that’s as satisfying as it is beautiful. Serve it in a clear glass bowl to let the colors shine, or pack it in individual jars for a portable, restaurant-quality meal.
Here’s how to build it perfectly.
Ingredients for 10 layer salad
Ten layers of texture and flavor—crisp, creamy, chewy, and tender—all in one bowl.
| Ingredient | Amount | Notes |
|---|---|---|
| Baby Spinach 🌿 | 4 cups | Fresh, loosely packed |
| Quinoa 🌾 | ¾ cup | Uncooked, rinsed well |
| Grilled Chicken Breast 🍗 | 1 ½ cups | Diced, skinless, boneless |
| Avocado 🥑 | 1 whole | Ripe, sliced into wedges |
| Cucumber 🥒 | 1 whole | English or Persian, thinly sliced |
| Cherry Tomatoes 🍅 | 1 cup | Halved, vine-ripened preferred |
| Red Bell Pepper 🌶️ | ½ cup | Thinly sliced, seeds removed |
| Crispy Chickpeas 🧂 | ½ cup | Homemade or store-bought |
| Feta Cheese 🧀 | ½ cup | Crumbled, crumbled |
| Plain Greek Yogurt 🥛 | ½ cup | Full-fat for creaminess |
| Extra-Virgin Olive Oil 🫒 | ¼ cup | High-quality, fruity |
| Lemon Juice 🍋 | 2 tbsp | Freshly squeezed |
| Dried Oregano 🌿 | ½ tsp | For dressing depth |
| Honey 🍯 | 1 tbsp | For subtle sweetness |
| Diamond Crystal Kosher Salt 🧂 | 1 tsp | For seasoning balance |
The spinach is your foundation—organic baby spinach from the grocery store's refrigerated section keeps best. For quinoa, Trader Joe's or Bob's Red Mill brands cook up fluffier, and rinsing removes bitterness. Grilled chicken should be room temperature before dicing for even slices. Avocados are non-negotiable for that creamy element—pick ones that yield slightly to gentle pressure. The cucumber? English cucumbers have fewer seeds and more crunch than the big ones. Cherry tomatoes add sweetness, but heirloom varieties have deeper flavor if you're splurging.
No avocado? Sliced pear or apple adds sweetness without browning. Swap feta for vegan feta or goat cheese if needed. The dressing can be made ahead—store it in a jar for up to a week. For extra crunch, toasted nuts or seeds work in a pinch. The quinoa can be cooked in vegetable broth for added flavor. If you're short on time, pre-cooked quinoa from the store works (just check for added salt). The crispy chickpeas? Homemade is best—toss canned chickpeas with olive oil, salt, and bake at 400°F for 25 minutes until golden.
Assemble the salad right before serving to keep layers crisp. Store dressing separately and toss just before eating. Quinoa and chicken keep for 3 days in the fridge—portion them out ahead of time. The avocado and cucumber should be added last to prevent sogginess. For meal prep, pack layers separately in containers and assemble when ready to eat. This salad reheats poorly—always serve at room temperature for the best texture contrast.
Why You'll Love This Recipe
- I’ll be real: quinoa and avocado might sound fancy, but this salad costs me less than takeout. A single rotisserie chicken feeds four, and baby spinach stays affordable in bulk. Plus, the leftovers? Tastier the next day—proof that good food doesn’t have to break the bank.
- No Chopping Chaos: I swear by this one—just slice the cucumber into thick half-moons and halve the avocado right before assembling. The spinach and quinoa stay fresh for days, and the grilled chicken? Buy a pre-cooked rotisserie breast to shred in 10 minutes. That’s my kind of "fresh" that doesn’t require a knife marathon.
- Creamy Crunch Magic: Here’s what sold me—the avocado and cucumber work together like a dream team. The creamy avocado smooths out the quinoa’s slight bite, while the cucumber adds that just-right crunch that makes every bite satisfying. (Yes, even on a Tuesday night when you’re too tired to chew.)
- Lunchbox Hero: Between us, this is my go-to for packed lunches or potlucks. The layers hold up perfectly in a container—no soggy spinach here—and it’s hearty enough to keep me full until dinner. My coworkers actually ask for seconds at work events, which is basically a career highlight.
Step-by-step instructions for layered salad assembly
Building this 10-layer salad is easier than it sounds—just stack ingredients strategically for perfect texture contrast.
👨🍳 Step 1: Prepare the Creamy Yogurt Dressing
In a small bowl, whisk together the 0.5 cup plain Greek yogurt, 0.25 cup extra-virgin olive oil, 2 tbsp lemon juice, 1 tbsp honey, 0.5 tsp dried oregano, and 1 tsp diamond crystal kosher salt. The dressing should be thick but pourable—if it's too stiff, whisk in 1-2 teaspoons of water until it reaches a smooth, creamy consistency.
Taste and adjust seasoning—you want bright lemon acidity balanced by the sweet honey and herby oregano. Here's the thing: this creamy base ties all the layers together, so don't skip tasting. The yogurt provides that signature creamy texture promised in the title, while the olive oil adds richness that carries through every bite.
🥘 Step 2: Cook and Assemble the Base Layers
Rinse the 0.75 cup quinoa thoroughly, then cook according to package instructions (usually 15 minutes in boiling water, then 5 minutes off heat). Spread the cooked quinoa evenly on a large serving platter or individual plates to form the first layer. Let it cool slightly—warm quinoa will make the salad soggy.
Next, layer the 4 cups baby spinach evenly over the quinoa, gently pressing down to create a flat base. This leafy foundation will hold all the subsequent layers without collapsing. I like to use my fingers to smooth out any uneven spots—this ensures each serving gets an equal distribution of all components.
🍳 Step 3: Build the Middle Texture Layers
Create the third layer by distributing the 1.5 cups grilled chicken breast evenly over the spinach. The warm chicken will help infuse flavor into the cooler layers below. Next, spread the 1 whole avocado slices and 1 whole cucumber slices in alternating patterns—this creates visual appeal while maintaining texture contrast.
Add the 1 cup cherry tomatoes (halved) and 0.5 cup red bell pepper slices in a crisscross pattern. Here's where the stacking gets fun: the juicy tomatoes and crisp bell peppers add vibrant color and acidity that cuts through the richness of the chicken and avocado. Press down lightly to ensure everything stays in place—you want minimal shifting when you serve.
🔪 Step 4: Add Crunchy and Cheesy Top Layers
Sprinkle the 0.5 cup crispy chickpeas evenly over the vegetables—they'll add that satisfying crunch at every bite. Finally, distribute the 0.5 cup feta cheese crumbles across the top. The feta provides salty contrast to the sweet honey dressing and creamy yogurt, while the chickpeas deliver that promised texture variety from crispy to creamy.
Drizzle about 2 tablespoons of the yogurt dressing over each serving to start—this prevents the salad from becoming too dry. Real talk: the dressing will seep down through the layers as it sits, so don't overdo it initially. The remaining dressing can be served on the side for those who prefer extra creaminess.
⏰ Step 5: Final Assembly and Serving
Let the salad rest for 10-15 minutes before serving. This allows the flavors to meld and the dressing to distribute evenly through all layers. When ready to serve, drizzle additional dressing generously over each portion and garnish with extra feta crumbles if desired.
The perfect 10-layer salad should deliver a symphony of textures: creamy quinoa and yogurt, tender chicken, juicy avocado, crisp vegetables, crunchy chickpeas, and salty feta. Each forkful should balance these elements—here's the magic: the layers work together to create a harmonious bite that's far more interesting than a simple mixed salad. Serve immediately while the avocado is still vibrant and the chickpeas maintain their crispness.
Pro Tips For Making 10 Layer Salad
- Dry the quinoa properly: I learned this the hard way—undercooked quinoa turns your salad into a mushy disaster. Rinse it first, then spread it on a baking sheet in a single layer and bake at 300°F for 10 minutes. This guarantees firm, separate grains that won’t dissolve when dressed.
- Slice cucumber last: Cucumbers release water like a faucet left running. Save yourself soggy layers by peeling and slicing them just before assembling, then patting them dry with a paper towel. Yes, it’s extra work—but your salad will stay crisp for hours.
- Rest the chicken: After grilling, tent that chicken with foil and let it sit for 10 minutes. Skipping this step makes shredding harder and dries out the meat faster. Use a fork to pull it apart while warm, then let it cool completely before layering—this keeps it from turning rubbery in the fridge.
- Use room-temperature avocado: Cold avocado gets mushy fast, especially when layered with acidic ingredients like cucumber. Take it out of the fridge 30 minutes before assembling. Slice it just before adding to the salad—no one wants a brown, sad avocado in their 10-layer masterpiece.
Common mistakes when making your 10 layer salad
Layer Collapse
Your biggest enemy is soggy layers, and it starts with the spinach base. If you pile too many ingredients on top too quickly, the juices from the avocado and tomatoes will seep down, turning your crisp salad into a mushy mess.
I’ve seen this happen when people skip the 10-15 minute rest before serving—always let the dressing distribute gradually. For extra insurance, pat the spinach dry with paper towels before layering. 🥗
Uneven Distribution
Uneven layers ruin the visual appeal and flavor balance. I’ve caught myself rushing this part, only to end up with one side of the platter overloaded with quinoa and another with bare spinach.
Use a large serving spoon to portion ingredients evenly—think of it like building a lasagna, but with more textures. For individual servings, assemble each bowl separately to guarantee consistency. Trust me, your guests will notice the difference!
Dressing Overload
Too much dressing at once will drown your salad’s textures, turning crisp chickpeas into soggy bits. I’ve made this mistake by pouring the entire dressing over immediately—big no. Start with just 2 tablespoons per serving and let it seep down naturally.
Keep the rest on the side so everyone can customize their creaminess level. Pro tip: Use a small squeeze bottle to control drizzling like a pro. 💫
Skipping the Rest
Rushing to serve immediately is a common mistake that leads to a salad that falls apart. The 10-15 minute rest isn’t just for show—it lets flavors meld and the dressing distribute evenly.
I’ve seen salads where the top layer of feta and chickpeas slides off because it wasn’t given time to settle. This is especially critical if you’re serving in a glass bowl—the layers need time to bond. Patience pays off with a salad that holds its shape!
Ignoring Texture Balance
Every layer must contribute to the crisp-to-creamy spectrum, or your salad becomes one-note. I’ve tried versions where the chickpeas weren’t crisp enough or the quinoa was too dry—both throw off the harmony.
For crispy chickpeas, bake them fresh (toss canned chickpeas with olive oil and bake at 400°F for 25 minutes). For creamy elements, chill the yogurt dressing before drizzling to enhance its richness. Each texture should shine, not compete.
Wrong Ingredient Order
The layering sequence matters more than you’d think. Starting with spinach (not quinoa) creates a stable base that won’t collapse. I’ve seen salads where the quinoa was on top, leading to a wobbly tower.
Always follow the heaviest-to-lightest rule: quinoa (heaviest), spinach, chicken, avocado, cucumber, tomatoes, bell pepper, chickpeas (lightest), and feta on top. This keeps everything in place and prevents toppings from sliding off. 🏗️
Nutrition facts
Frequently asked questions
Can I make this salad ahead of time?
Yes, but with smart prep! Assemble all layers except the avocado and cucumber, then store in an airtight container for up to 2 days. Keep the dressing separate until serving. Add the avocado and cucumber just before eating to prevent browning and sogginess. For meal prep, pack components separately and build bowls individually.
How do I keep the layers from sliding?
Use the heaviest-to-lightest layering order: quinoa first, then spinach, followed by chicken and heavier veggies. Press each layer gently as you go. For individual servings, assemble in glass bowls—they grip ingredients better than plastic. Chill the salad for 10 minutes before serving to help everything settle.
What if I don't eat chicken?
No problem! Swap the grilled chicken for roasted chickpeas, crispy tofu, or grilled halloumi cheese for a plant-based option. For extra protein, add white beans or quinoa (already in the recipe). The layering structure works perfectly with any protein—just adjust quantities to maintain balance.
Can I use this for meal prep?
Prep the dressing, cook the quinoa, and chop all veggies ahead. Store components in separate containers in the fridge for 3-4 days. When ready to eat, assemble each serving fresh. For best texture, keep the avocado and cucumber separate until serving day—this prevents sogginess and maintains crispness.
What's the secret to perfect crispy chickpeas?
Drain and thoroughly dry canned chickpeas, then toss with 1 tbsp olive oil and ½ tsp salt. Spread on a baking sheet in a single layer and bake at 400°F for 25-30 minutes, stirring halfway. They're done when golden and crispy—no need to overcook! Store in an airtight container for up to 5 days.